Retro fit aircon in an S1
By Barry Mather.
Back in 2018 (I think) I had grand plans to take my S1 Elise on a road trip of a few thousand kilometers. There were two major things that needed addressing though; luggage storage and aircon.
Working out how to carry a suitcase or duffle bag is necessary as I’ve removed the boot of my S1 to make way for more important things. At the time it was a turbo – that’s since been replaced with a nicely made ‘over the top’ exhaust manifold. So I set about designing a luggage rack to sit over the boot lid.
I procured some 25mm (ish) aluminium tubing with ~2.5mm wall thickness and set about bending and welding a rack together. The back of the rack slots into the wing mounts (I have to take the wing off to use the rack, but its only 4 bolts) and is held in place with a stainless pin with an R clip for easy access to the engine bay. The front of the rack attaches to a cross bar that is bolted through the clam near the rear windscreen with a spreader plate on the inside of the clam. It’s only 3 bolts per side to remove. The rack is then hinged using heim joints.
I gave the rack a ‘John Deere’ paint job and overall I’m pretty happy with the results. There is space for a couple of waterproof duffle bags to be held on with ratchet straps. The wing mounts are braced under the clam to the rear subframe so should be plenty strong enough for a few bags.
With the luggage rack sorted I turned my attention to the much more complicated problem of aircon.
I transitioned through a few different designs before I settled on a suitable solution. The first iteration used an electric compressor – at first I thought this would be a great solution, it kept the pipework short and I’d already relocated the battery from the front to behind the driver’s seat (it’s a small lightweight battery). But what I didn’t realise was how much power would be required. The stock alternator wasn’t producing enough juice to run it and the battery was too small. I didn’t want to install a much bigger battery or alternator so the electric compressor was removed and stored for another project.
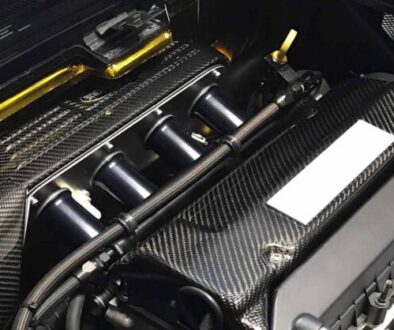
So I moved onto a more traditional plan of using an engine powered compressor. The Honda compressor is quite large and will not fit in the Lotus chassis – but there was potential space where the power steering pump is normally located; just above the intake manifold. So I took a few generic measurements and headed to a wreckers yard – but there are not too many left in Brisbane that you can wander around and remove whatever parts you need, possibly something to do with insurance. But I found ‘King Auto Wreckers’ in Willawong and headed there with a small toolbox.
I wandered around for an hour looking at all the various cars trying to find the smallest a/c compressor. I ended up with a ‘D09’ compressor from a 2017 Mazda 3 – and from what I can tell all Mazdas from this era use the same compressor. I made sure to get a few a/c fittings and tubes while I was there and I set about making a bracket to fit the compressor in. It turned out to be fairly easy by bending some thick wall steel tube and making a few tabs – everything was almost too easy and of course the picture tells a thousand words!
Under the compressor there is another bracket to brace it and it’s extremely stable. One downside is that the Mazda compressor is only a 6 rib belt against the 8 rib Honda pulleys, but I didn’t think it would be an issue to run a 6 rib belt on 8 rib pulleys.
Routing the hoses was pretty straight forward using a mixture of hard lines and along with 10″ and 6″ flexible hoses. I sourced bulkhead fittings at the front and rear of the sills from Speedy Air Spares who carry a large range of a/c fittings and hoses.
I also purchased a hydraulic crimping tool specific to a/c hoses given I’d need to make up a few custom length hoses. Running the hose through the sill was tight, and I ended up with a few scraped knuckles but it works.
I then turned my attention to the front – I needed to install 3 items; a condenser, an evaporator/blower fan and a dryer.
I removed the front clam and engine radiator/shroud and installed a large condenser under the main radiator along with a single large fan. The dryer was easily installed on the side of the crash structure (the same as later S2/S3 Elises) and I made up several hoses to connect it all together. Then it was time to design and build a box for the evaporator. I searched through many online images to try and find one that would fit – I’d already removed the heater box so I had plenty of space, but I also have to leave space for the ABS unit (that’s a story for another time though).
I ended up with an evaporator of the perfect size – from the rear cabin of an NM Pajero. I bought a second hand unit along with the TX valve and setup about building a box for it. I made sure to leave around 20mm of space under the evaporator to allow for condensation to collect which drains through a 10mm hose into the wheel well – there is a handy hole already there to route the hose through. I bent up some 1.6mm aluminium to house the evaporator with an inlet for a cage fan and an outlet for some flexible hose to link into the standard Lotus air plenum leading to the cabin.
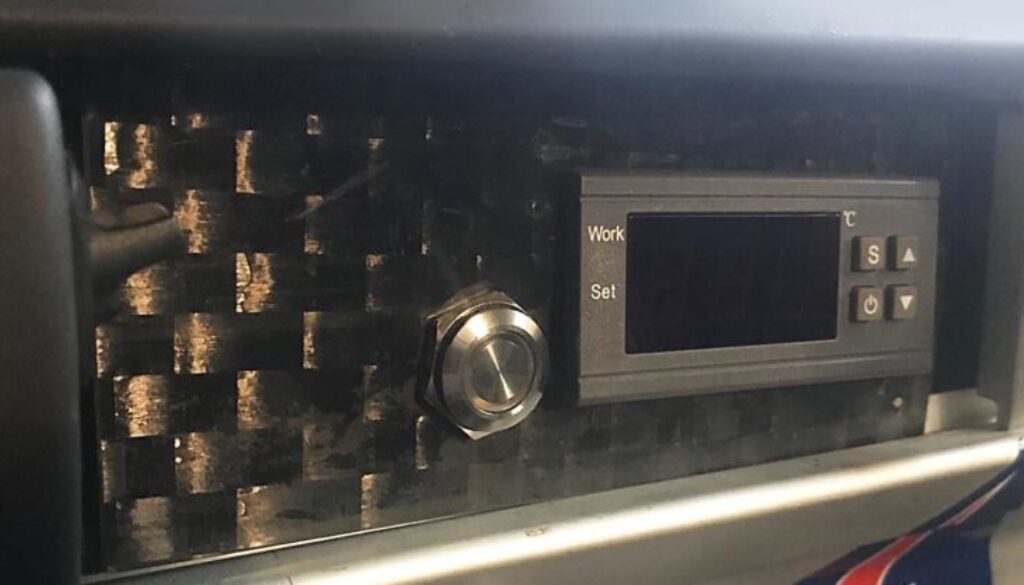
With all of the physical parts of the a/c system installed it was time to look into how to control the clutch on the compressor. I turned to eBay and found a fridge/freezer control that fits the bill perfectly. There is a small temperature probe that’s installed into the airstream from the evaporator and you simply set the temp desired and run a wire to the compressor to activate the clutch – simple!
Getting the system charged with R134 was easy enough and I can now enjoy cool, crisp 16 degree air. I transitioned through several different designs for the evaporator unit, the Pajero one is by far the best fitting solution and is perfectly sized for the Elise cabin.
So, can you have a/c in an Elise S1? Of course! It’s not hard to do and really only requires a few weekends to put together once you have the shopping list of parts!